Transforming Lucky C400 Film Scans: A Comprehensive Guide to Color Correction
| Shelf | Cameras & Lenses |
|---|---|
| Date in | |
| Readers | 932 |
Learn how to effectively correct the yellow-green tint in Lucky C400 film scans using proven techniques and software tools.
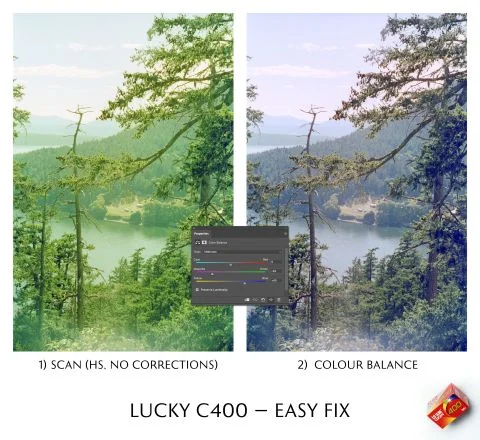
The Lucky C400 is a new color-negative film manufactured in China, and has garnered attention for its vibrant color potential. As the second color film released in the PRC since 2012, following the Lucky C200, it built anticipation among photographers seeking affordable alternatives. Although initial captures during the 2026 Lunar New Year celebrations showcased promising results, many users encountered a frustrating issue: an unexpected green-yellow tint that complicated the scanning process. This guide explores the underlying causes of this tint and provides step-by-step solutions to alleviate the issue.
Understanding My Setup
For my scanning process, I'm utilizing the Nikon SUPER COOLSCAN 5000ED paired with the VueScan software. Despite its vintage status from the early 2010s, the 5000ED remains a high-resolution, high-speed scanner that's frequently recommended for film enthusiasts. My workflow involves archiving scans as digital negatives with neutral settings, followed by creating an inverted copy. Since scanner settings and software can significantly influence color results, I'll offer my working files to assist with testing on your preferred software.
It’s crucial to ensure that you’re receiving high-quality, flat scans—aim for 16-bit TIFF files or camera RAW formats, as these provide the best foundation for post-processing. If you're facing issues with your Lucky C400 scans, I encourage you to reach out to your lab to inquire about these options.
Identifying the Problem
Distinct from typical color films, Lucky C400 and its predecessor C200 exhibit a thicker feel, and their milky appearance prior to drying can raise concerns for inexperienced handlers. The film's orange mask differs from standard brands like Kodak or Fujifilm, which contributes to scanning challenges. While C200 generally delivers accurate color on the first pass, the C400 often emerges problematic with pronounced yellow-toned casts.
For example, in my past work with C400, I initially adjusted the green midtones using the Color Balance tool. Though this method remedied some frames, numerous images displayed extreme color deviations that mere adjustments couldn’t correct. One such example was a portrait that bore a complex yellow-green hue, a problem that suggested that the film base itself could be introducing a strong blue cast when inverted. My assessments, corroborated by experiences detailed by other photographers, indicated the necessity of effective exposure techniques as well.
Photographers like Norbi Whitney have observed improvements when increasing exposure—by decreasing shutter speed or opening the lens aperture—leading to better results while scanning. Additionally, Derrick Buckner noted similar outcomes using RGB backlighting during home scanning. This feedback underscores the fact that color casts likely arise from a combination of factors, including lighting conditions at the time of capture and the nature of the film itself.
Upon examining different negatives, I found that successful scans tended to have less visible bright-orange mask. Yet, overly exposed negatives often complicated adjustments; dark purple areas obscured the mask, while effective lighting setups without deep shadows made color correction simpler.
Step-by-Step Fix for Photoshop Users
While my experiences may differ from others depending on the hardware and software used, the following steps aim to address common worst-case scenarios with Lucky C400. First, ensure your machine is calibrated and your scanned images are organized properly. I recommend working with a fresh file, duplicating the original layer for non-destructive editing.
1. **Adjust the Color Balance**: Open the Color Balance adjustment layer. Start by lowering the green in midtones, then carefully modify shadows and highlights to achieve a balanced color palette.
2. **Utilize Levels or Curves**: After setting the colors, navigate to Levels or Curves. Adjust the individual RGB channels to account for any remaining color casts. Pay particular attention to the blue channel; often, raising the midpoints here can counteract excess yellow.
3. **Consider Selective Color**: If certain colors continue to skew off balance, make use of the Selective Color tool. For example, reducing yellow in whites can provide a cleaner outcome in portraits or landscape images.
4. **Layer Masks**: Finally, apply layer masks where necessary to further isolate and fix areas that may need refinement without affecting the rest of your image.
Final Thoughts
While working through the challenges of Lucky C400 scans can be daunting, understanding the root causes of the green-yellow tint and employing targeted adjustments can yield stunning results. The unique characteristics of this film demand patience and experimentation, but with the right approach, its potential can shine brightly in your photography portfolio. By adjusting our scanning and editing methods, we can transform those problematic frames into beautiful memories to cherish.
For those looking to experiment further or reference my process, I’ve made my working files available for download. This community-driven approach ensures that together, we can navigate the hurdles of film photography with creativity and skill.